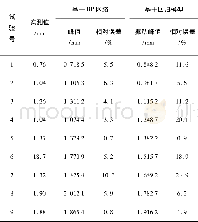
《Table 1 Maximum radial deviation of actual groove and theoretical tooth profile》
 提示:宽带有限、当前游客访问压缩模式
本系列图表出处文件名:随高清版一同展现
《一种基于三坐标测量机的齿形参数精密测量方法(英文)》
In order to better study the theoretical value of gear profile and the deviation of actual measurement of tooth profile,four spatial symmetric teeth are selected to collect intensive points.The program of collecting points automatically compacts the probe to measure the teeth profile more accurately,and the actual teeth profile and the theoretical teeth shape are superimposed in Fig.7.The maximum radial deviations of four symmetrical teeth are measured as shown in Table 1.The results show that the radial deviation between the two sides of the symmetrical direction is less than 0.04mm.The maximum radial deviation of the bottom of the center line of the same tooth is 4%,and the result of curve fitting shows that the actual tooth shape and the tooth height of the theoretical tooth form are inconsistent.The radial deviation of the maximum trough bottom of the two teeth is also present.It may be that when the gear is processed,it does not guarantee the precise processing after the forging,and the tooth shape of the gear is polished and grinding.Therefore,the actual production of gear should consider the accuracy of the processing equipment and the material properties of the processed parts,and it is also important to measure the gear after finishing the machining.However,the machining accuracy of the gear has a large deviation,which may lead to cracks in the synchronous belt during practical application.
| 图表编号 | XD0066497200 严禁用于非法目的 |
|---|---|
| 绘制时间 | 2019.06.28 |
| 作者 | 王中旺、蒋全胜、李华 |
| 绘制单位 | 苏州科技大学机械工程学院、苏州市精密与高效加工技术重点实验室、苏州科技大学机械工程学院、苏州市精密与高效加工技术重点实验室、苏州科技大学机械工程学院、苏州市精密与高效加工技术重点实验室 |
| 更多格式 | 高清、无水印(增值服务) |
查看“Table 1 Maximum radial deviation of actual groove and theoretical tooth profile”的人还看了
-

- Table 1 Minimum, maximum, mean, standard deviation (st.dev.) and range values of TCA, DI, and TGSI in 2015


